Pages

Saturday, November 27, 2010

Oven-Dried Plum Tomatoes


What do blood cells, McGill University, Peru, pink and wines have in common? This is the theme of our recent cooking session. I'll start with my contribution of the evening. For appetizers, I wanted to make something on my Must-do list and one that came to mind was this simple and flavor-packed oven-roasted cherry tomatoes when I was at Aimee's summer potluck. Here is her post on Simple Bites. You can also find an alternative version of our local food blogger Elaine on A Series of Kitchen Experiments

Plum tomatoes were on sale and I read a scientific article (found here) that plum tomatoes take less time to dehydrate than "regular" tomatoes because of the moisture content. This requires less than 10 minutes of your time to prepare this appetizer, but a lot of time to dry the tomatoes about 6-8 hours or overnight. Here's a tip: if you don't feel comfortable of leaving your oven on for that long, make it at a friend's place whose his electricity is included in the rent. This is what I did. Serve these tomatoes with multigrain crackers and soft spreadable cheese such as Boursin Herbs and Garlic. I can guarantee you that your guests won't resist of eating more than one.

Preparation: 10 mins
Roasting Time: 6-8 hours

Ingredients

12 plum tomatoes, quartered
Olive oil
Salt and Pepper

Procedure

1. Preheat oven to 400F.

2. Place plum tomatoes in a bowl. Drizzle with olive oil and season with salt and pepper.

3. Line a baking sheet with aluminium foil or parchment paper. Arrange tomatoes skin side-down.

4. Set oven to your lowest heat setting. Bake for 6-8 hours until edges have shriveled and inside still moist but not juicy.


5. Serve with soft cheese and crackers.


Preserving oven-dried tomatoes

Transfer tomatoes in a clean and sterilized jar, pour olive oil to cover. You can add a crushed garlic and a few sprigs of fresh herb such as oregano and marjoram. Preserve up to 2 weeks in the fridge.

After a few days, give a nice roasted tomato flavor to your dishes (or salads) with the preserved tomato oil.


Wednesday, November 24, 2010

Vanilla Cream Pie with Caramelized Apple Topping

Does it occur to you that you have a surplus of egg whites (or egg yolks) and you have no idea what to do with it? Over a year ago, I tried to make a lemon custard which required a fair amount of egg yolks. I disastrously overcooked the egg yolks and end up with a curdled mess. I felt so bad of wasting them that I gave up making custard desserts, fearing that I will mess up again. I also didn't want to end up with a big batch of egg whites lying around my fridge.

Last week, my Taiwanese friend wanted to make a vanilla cream pie. Since I'm using his eggs, I don't feel bad if I mess the custard so I went for it.  It is very similar to the Lemon Meringue Pie, but the pastry cream is made first, refrigerated and then transfered onto the baked pie shell. Also, we used caramelized apples as our topping instead of the meringue. Unfortunately, I did not take any pictures of the pastry cream which ended up to be a great success. Oh well, there is always next time. The cream recipe is adapted from allrecipes.com.

Serves 8
Preparation Time: 45 mins
Cooking Time: 40 mins
Printable Recipe

Ingredients

1 pie dough

Vanilla Pastry Cream

2 cups whole milk
6 egg yolks
1 tsp vanilla extract
1/2 cup white sugar
4 tbsp all-purpose flour
4 tbsp unsalted butter
1 pinch salt

Caramelized Apple Topping

1 tbsp butter
5-6 Golden Delicious apples, peeled and diced
1/2 lemon, juiced
1/3 cup + 1/2 cup brown sugar

Procedure

1. In a saucepan, place milk, half of the sugar and vanilla extract over medium heat.

2. In a bowl, combine egg yolks and sugar, whisk until pale and thick. Mix in flour and salt.

3. When milk starts to boil, remove from heat. Slowly pour half of the hot milk into the yolk mix, stirring constantly.

4. Place all the yolk mixture into saucepan over medium heat.

5. Remove from heat and stir in butter. Strain for a smoother texture. Transfer to a bowl and cover with plastic wrap directly on the cream to prevent skin formation.

6. Preheat oven to 350F.

7. Butter a 9'' pie pan. Prepare pie dough. Roll out dough onto 9'' pie plate. Prick the bottom with a fork.

8. Bake for 15 mins until golden brown.

9. In a saucepan, melt butter over medium-low heat. Add apples and cook in lemon juice and 1/3 cup brown sugar

10. Remove baked pie dough from the oven. Spread with pastry cream and topped with cooked apples.

11. Sprinkle the remaining brown sugar under a broiler until sugar caramelizes. Serve hot.

Friday, November 19, 2010

Bite-Size Parmesan Chicken


I'm not from the South, but I love Southern cuisine. The ingredients are easy to find, the dishes are simple to make, and the food is all about comfy and homey. Last week, chicken breasts were on special and it has been a while that I haven't eaten any bread crumb coated chicken. I found on Simply Recipes a mouthwatering dish that I need to absolutely make it at my next cooking session and I did! The bite-size parmesan chicken was a great hit and some of us tempted to eat more than others (including me). Think of this dish as the fresh and tastier version of chicken nuggets.

Serves 6
Preparation Time: 15 mins
Cooknig Time: 15 mins
Printable Recipe

Ingredients

3 chicken breasts, cut into bite size
2 garlic cloves, minced
1/2 cup butter, melted
1/2 cup Parmesan, grated
3 tbsp parsley, chopped
1/4 tsp garlic powder
1 tsp Italian seasoning
Salt and Pepper

Procedure

1. Preheat oven to 450F. Pat chicken pieces dry and toss in 2 tsp of salt.


2. In a bowl, combine melted butter and garlic. In another bowl, mix together bread crumbs, Parmesan, parsley, garlic powder, Italian seasonings, salt and pepper.


3. Dip chicken in butter then into bread crumb mix to coat.

4. Place coated chicken pieces on 9''x13'' baking pan. Leave room between each piece. Drizzle with remaining butter.


5. Bake for 15 mins or until chicken runs clear. Serve.

Tuesday, November 16, 2010

No-Cream Creamy Broccoli Soup


Potatoes are a versatile ingredient to have in your pantry. Since it is considered as a starch (not a vegetable), you can use it as a thickener to give a creamy texture to the soup. This creamless broccoli soup can easily fool you and your guests for a cream of broccoli soup. This soup requires only three main ingredients, making it vegan, dairy-free and gluten-free. Tip: if the soup is too salty, add more steamed broccoli instead of water.

Serves 6
Preparation Time: 10 mins
Cooking time: 20 mins
Printable Recipe

Ingredients

1 large russet potato, peeled and cubed
3-4 broccolis, chopped
3 1/2 cups vegetable stock
Salt and Pepper to taste

Procedure

1. In a large pot, combine potatoes, broccolis and vegetable stock. Cover and bring it to a boil. Reduce heat to medium-low and simmer for 20 mins or until potatoes are soft.


2. Purée mixture with an immersion blender. Season with salt and pepper. Serve.

Saturday, November 13, 2010

Tex-Mex Casserole


In our cooking group, some speaks French, some speaks English and some speaks both of these languages. These two languages are commonly spoken in Montreal. The T theme can be employed either in English and/or in French. When I sent the instructions to my cooking group about the T theme, I told them, as an example, that they are not allowed to make Apple Pie (as it starts with an A) but they are allowed to make Tarte aux pommes which is simply the French translation of Apple Pie. Our new member, Kristin of Chocolate and Tea, impresses me with her interpretation of this instruction.  She made a firm, crisp and sweet apple tart with almond cream, a classic French tart which we called Tarte aux Pommes à la Normande. You can find this recipe and other mouth-watering desserts on her blog. Check it out!

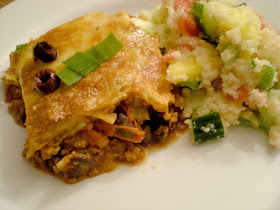
For the T theme, I made a tex-mex casserole. It is basically the casserole version of nachos using exactly the same ingredients, but with more cheese, more ground beef and more veggies. This reconstruct version of nachos will sure satisfy your family and friends. This recipe is adapted from my favorite cooking show, Best Recipes Ever.

Serves 12
Preparation Time: 15 mins
Cooking Time: 40 mins
Printable Recipe

Ingredients

1 1/2 lb ground beef
1 small onion, chopped
2 garlic cloves, minced
1 green pepper, chopped
1 tsp ground cumin
1/2 tsp dried oregano
Salt and Pepper
1 19oz. can black beans, drained and rinsed
5-6 large tomatoes, diced
1 6oz. can tomato paste
1 cup corn kernels
Baked corn chips, coarsely crumbled
Mozzarella and/or cheddar cheese, grated
1 green onion, thinly sliced
Black olives, sliced

Procedure

1. In a large skillet, heat oil over medium-high heat. Cook beef until no longer pink. Drain off fat.


2. Add in onion, garlic, green pepper, cumin, and oregano. Season with salt and pepper. Cook until softened.


3. Add in black beans, tomatoes and tomato paste. Bring to a boil and reduce heat to a simmer. Cook until slightly thickened, about 10 mins. Add in corn kernels.

4. Preheat oven to 375F.

5. Transfer mixture to a 13'' x 9'' baking pan.


6. Top with a layer of corn chips and sprinkle with cheese.  Bake for 15 mins or until cheese is melted. Sprinkle with green onions and olives.

Thursday, November 11, 2010

Tropical Tabbouleh


Organizing cooking sessions for over two years made me realized that we do not eat enough vegetables. For the past few sessions and the following ones, a salad course is added to the menu along with the usual full course meal. To continue with the letter T theme, my Brazilian friend has chosen to make a tropical tabbouleh, a fresh and fruity salad which can be used as sides to calm down the heat of spicy foods.

Serves 8
Preparation Time: 10 mins
Cooking Time: 45 mins
Printable Recipe

Ingredients

1 3/4 cups bulgar wheat
1/4 cup lemon or lime juice
3 tbsp olive oil
2 tsp salt
1/2 tsp ground pepper
2-3 spring onions, diced
2 tomatoes, seeded and cubed
1 cucumber, cubed
1 cup pineapple, cubed
2 mangos, cubed

Procedure

1. In a bowl, soak bulgar wheat in boiling water until soft to bite, about 45 mins. Drain with a colander.

2. In another bowl, combine lemon juice, olive oil, salt and pepper. Add in cooked bulgar.

3. Stir in spring onions, tomatoes, cucumber, pineapple and mangos. Serve.

Tuesday, November 9, 2010

Thai Coconut Soup (Tom Kha Gai)


What twist do you add on a classic chicken soup? A few months ago, I was trying to figure out a theme for the next cooking session with my group of friends. I was out of ideas and decided to let my brother to choose one. The theme was unusual and was not sure if it was going to work. He suggested to my friends to create a dish which starts with the letter T. I was amazed how well this theme works. As usual, we always have a full course meal: soup, appetizers, main dish, sides and dessert.

Let's start with the soup. My Australian friend decided to make a Thai coconut soup, which consists of coconut milk, galanga, lemongrass and chicken. I really enjoyed the soup, one sip of the soup will burst your mouth with sweet, sour and spicy flavors. This is great for the cold times. Try it out, you won't regret it!

Serves 8
Preparation Time: 15 mins
Cooking Time: 40 mins
Printable Recipe

Ingredients

4 cups chicken broth
15-20 kaffir lime leaves
4” galanga root, cut into thick slices
4 stalks lemongrass, cut finely
2 boneless chicken breast, cut into bite size
1 can coconut milk
juice of 2-3 limes (adjust to taste)
2-4 tbsp fish sauce (adjust to taste)
1-2 red chillies (dried or fresh)
about 1 tbsp of palm sugar or brown sugar (adjust to taste)
250g cremini, shiitake and/or oyster mushrooms
3 scallions, thinly sliced
½ cup cherry tomatoes
¼ cup coriander leaves, chopped

Procedure

1. In a soup pot, bring stock to a boil with lime leaves, galanga, and lemongrass. Reduce heat and simmer for 20-30 minutes to let flavours infuse.

2. Add chicken, cook for another 5-8 minutes.


3. Add the coconut milk. Add lime juice, fish sauce, chillies, and sugar. Adjust quantities to get the right balance of sweet, sour, salty, and hot flavours.


4. Add the mushrooms, scallions and tomatoes, and let simmer for five minutes.

5. Remove lime leaves, galanga, lemongrass. Serve with coriander.

Saturday, November 6, 2010

Candied Apples

Have you made any delicious treats for Halloween? Here's a delicious and crunchy treat that will revive your childhood memory. It is simple and easy to make which will satisfy your friends and family. One quick tip: Be careful when handling hot syrup!

Makes 4-6 apples
Preparation time: 5 mins
Cooking Time: 30 mins
Printable Recipe

Ingredients

4-6 apples, washed and dried
1/2 cup corn syrup
3/4 cup water
2 cups sugar
Popsicle sticks

Preparation

1. Lightly oil baking sheets. Place a popsicle stick on each apple.

2. In a medium saucepan, combine corn syrup, water and sugar.

3. Heat mixture to 300F on candy thermometer or until a small droplet of syrup hardens in cold water. Don't stir, otherwise the mixture will not thicken.

4. Coat apples with syrup while it is hot. Place it on the prepared baking sheets. Repeat with the remaining apples. Let it cool until syrup hardens, about 20 mins.